


There appears to be only one article specifically about using Google Workbox to create a Progressive Web App for Phaser, and it is this one from 2019 with the Github repo here. It refers to Phaser 3.18 and Workbox 4.0, and a few changes have been made to both platforms since then with Phaser currently at 3.61 beta and Workbox at version 7.0. About time we had a new tutorial, because the possibilities for combining them intrigues me for the purposes of releasing my own game, as I talked about in my last devblog post.
I am not going to sell you on the concept of a PWA, there are plenty of those sort of pieces on the Web if you look for them. I will assume you have read them all and just want to try it yourself, like me when I came to writing this, and that you already have a Phaser game and are thinking of deploying it as a PWA either as a standalone product or a separate channel to the App Store and Play Store.
There are a few decisions you have to make before you jump in. Are you going to use a wizard to guide you through the Workbox portion, or are you going to take more control over the process to set rules for caching assets on the client device? The differences are laid out in this article by Google. If it’s the former, easier route, you use workbox-cli; if it’s the latter, go with workbox-build. If, like me, you also use Webpack in your Phaser project for development builds, then going with the third Google-endorsed option of workbox-webpack-plugin is a no-brainer, as you can choose either model from within that plugin framework.
The aforementioned article from 2019 will probably suffice if you want to use the wizard. I want to do it the hard way, so I will use the build version with InjectManifest for this article through the Webpack plugin.
Go to your Phaser project folder and install Workbox:npm install workbox-webpack-plugin
Don’t follow the advice of some tutorials who tell you to add --global to that line, as it will not install in your Phaser project.
If you immediately run your Webpack build process through npm, yarn or whatever you use, you will hopefully produce a PWA right out of the box, although this will require a lot of tweaking before it deserves the name and fulfils the promise of the concept. I got this message first try, for instance:


You will want to get the Phaser bundle precached, for a start! This is the point where it should be mentioned that if you are aiming your PWA at Apple devices, you are going to run into a hard limit of 50MB for precached files on the iOS device. Once you include Phaser itself and whatever other libraries you want to bundle (I have rexUI, Three.js and Firebase, for instance) you will see the base Phaser file of about 7MB balloon out to form a significant fraction of that 50MB.
My game has an app weight of about 100MB at this stage, including 74MB of images in multiatlas files packed by TexturePacker, and I haven’t included audio yet. This means I am going to have to make some decisions about prioritising what is not permanently stored with the app on iOS. Here is where Workbox comes into its own, because it allows you to control exactly which files are included as part of the core PWA bundle, which chunks of data are downloaded each time the user opens the app, and which assets are tucked away in unreliable but useful storage areas like indexedDB (more on that later).
The Workbox documentation spends a fair bit of time talking about use cases for Web sites, but of course we are talking about a game, which has different architectural requirements. The concept Google pushes of an application shell does, however, have some relevance with the most useful way to divide your art assets into categories based on the caching technique you use.
I don’t know how your project has evolved over time, but mine started with the basic (and recommended) template of a project folder containing a build folder where all the Webpacked files go, src for all the Phaser scene files, plus an assets folder where all the images and other assets lived, then a libs folder for third party scripts. The problem with all of these being in the project folder is that Workbox won’t pick them up easily unless they are accessible from the build folder. Notice the project folder structure in the github repo of Matt McKenna’s project: the Phaser app is in in a folder entitled basic/app which contains build, src and assets, but then all of those are copied into a folder entitled pwa where the Workbox files do their stuff, with the workbox-config.js file in that folder and an app folder underneath which includes the service worker file and the web manifest file.
You can do it that way, but it sounds a bit annoying to maintain the codebase for your Phaser app in two locations, especially if you are going to release a PWA through Workbox as well as a “native” app using Cordova or Capacitor. My release schedule is going to focus on PWA first with App/Play Stores later, so I am going to rearrange my folder structure to suit Workbox, at least for the short term.
Apart from the core Phaser build, it would be ideal to precache assets which form the “furniture” of your game. This includes, logos, fonts and third-party libraries, plus audio and image files for your interface. You will also want the user not to have to wait for assets related to the boot, preload, splash or home scenes, whichever of those you use.
Specifically for me, this means leaving the src folder in the root project folder where it is, as well as shifting the images folder out of assets to the root folder, but then moving the rest of assets along with libsinto the build folder alongside all the Phaser files built from Webpack, so that Workbox can access it more simply for precaching purposes. This mirrors somewhat the approach from Matt McKenna, with a few tweaks.
Since I use TexturePacker to smoosh my images together into atlas and multiatlas files with matching JSON and PNG assets, I am shifting those into their own folder called packs within the assets folder. Thus, the source images are all in their separate folders within images under the root folder according to which pack they are destined for but, when TexturePacker rolls them up, the JSON and PNG outputs both get saved to packs.
Also, the assets folder is renamed as shell to indicate that its contents are to be precached, and a second folder called outer is also created for files that are not to be precached. (If you can think of a more appropriate keyword than “outer”, let me know in the comments.) This is not strictly necessary for the syntax I use, as you will see below, but it is a handy mental reminder to yourself as much as anything.
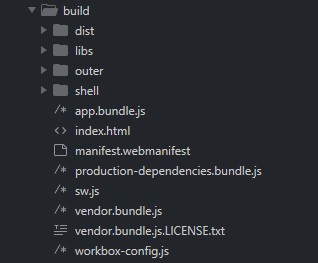
Here is my new build folder structure, where the Workbox Webpack plugin invades the build folder used by Webpack:

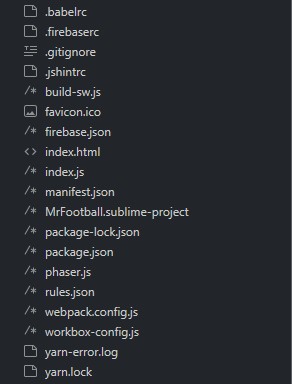
And for completeness, here are the files that are in the root of my project folder:

Now that we have a working prototype, let’s follow those instructions from Matt McKenna’s post to get it operating as a basic PWA before we optimise it. Create the manifest.webmanifest file in the build folder and populate it with something like this:
{
  "start_url": ".",
  "display": "standalone",
  "name": "Mr Football Beta",
  "short_name": "MRF Beta",
  "description": "Beta of the Mr Football management simulation game for mobiles",
  "icons": [
    {
      "src": "assets/image/app/icon_greenongreen.png",
      "sizes": "192x192",
      "type": "image/png"
    }
  ]
}
And add this line to the head tag of your index.html file (in your project root folder):
<link rel="manifest" href="/manifest.webmanifest">
Thanks again to Matt for those instructions! Hopefully you should be able to get the basic PWA working in its own window without the browser menus, albeit you have to go through the … menu in Chrome. This post is long enough as it is, I will get to the “Add to Home Screen” browser pop-up to improve user experience in a later post.
Now, let us proceed to building your service worker with Workbox. The instructions for creating it can be tricky, as Google’s documentation is rather obscure and incomplete. Nevertheless, we start by creating a “source service worker file” which we will call build-sw.js in the root folder of your project, which for my usage contains the following code:
import { skipWaiting, clientsClaim } from 'workbox-core';
import { cleanupOutdatedCaches, precacheAndRoute } from 'workbox-precaching';

skipWaiting();
clientsClaim();
cleanupOutdatedCaches();
precacheAndRoute(self.__WB_MANIFEST || []);
For the purposes of this tutorial, the last line is the one to focus in on, because it is a placeholder that Google says should be populated by a “precache manifest file”. Their text on the matter on that page is referring specifically to the workbox-cli and workbox-build tools, but we are using workbox-webpack-plugin which requires slightly different syntax for its methods.
Instead of creating a separate precache manifest file, you can get the precaching task done expediently in your webpack.config.js file in the root folder of your project:
const path = require('path');
const webpack = require('webpack');
const {InjectManifest} = require('workbox-webpack-plugin');

module.exports = {

  /* mode, performance, entry, output, module, optimization etc */

  plugins: [

  /* other plugins, leave this one to last */

    new InjectManifest({
        swSrc: './build-sw.js',
        swDest: './dist/sw.js',
        maximumFileSizeToCacheInBytes: 33554432,
        include: [
            'index.html',
            'app.bundle.js',
            'vendor.bundle.js',
            'production-dependencies.bundle.js',
            'sw.js'],
        additionalManifestEntries: [
            {url: path.resolve(__dirname, "shell/json/source.json"), revision: null},
            {url: path.resolve(__dirname, "shell/json/player.json"), revision: null},

            /* all other files to be precached are hardcoded here */

            ],
    	})
  ],
}
The default for maximumFileSizeToCacheInBytes is 2MB which would normally exclude your Phaser source, but I have multiplied that (arbitrarily) by 16 to get it to 32MB to accommodate whatever bloat you might be loading it up with depending on how many modules you don’t leave orphaned in the build. It doesn’t have to be a multiple, of course.
When you run Webpack to build your Phaser app under this new configuration, it should look a bit like this:
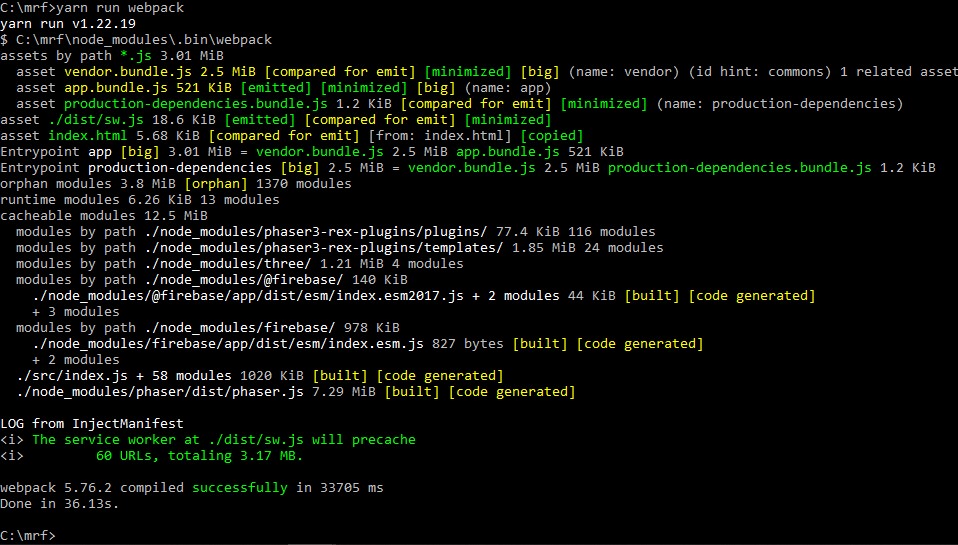
I am writing this article just after having got to this stage, so I am not across exactly why Webpack thinks that those 60 URLs total 3.17MB when the total file size referenced in my list is over 40MB. Perhaps that total is calculated only for the included elements and ignores the additional entries.
If you think Webpack is not picking up your file locations, go into the build/dist/sw.js file and look towards the bottom where the additionalManifestEntries outputs are listed. Look for any entries where the revision property is still null, which would indicate you mucked it up because they should all be populated with hash values of the target files.
As mentioned above, there are still things to do to make this a PWA worthy of the name. Pop ups for installing the app are just about mandatory, and there is still the problem of the 60MB or so of my assets that the user would have to download every time they open the app… unless I use workbox-indexeddb to store them on the device in another location. More on that in subsequent posts in this series.